Look, I get it. Your fan has been sitting there collecting dust for months – maybe years – and now it’s basically blowing dusty air around your room instead of providing the cool, clean breeze you actually want. You know you need to clean it, but you keep putting it off because it seems complicated or messy.
Here’s the truth: cleaning a fan is way easier than you think, and once you know the right steps, you can knock it out in 15 to 30 minutes depending on how dirty it is. I’m going to walk you through exactly how to clean every type of fan you might have in your home, using supplies you probably already own.
No fancy equipment needed. No expensive cleaners required. Just straightforward steps that actually work.
Why You Actually Need to Clean Your Fan
Before we dive into the how, let’s talk about why this matters, because understanding the “why” makes you more likely to actually do it.
Health Reasons: That dust coating your fan blades isn’t just sitting there peacefully. Every time you turn the fan on, you’re launching dust, allergens, pet dander, and possibly mold spores into the air you’re breathing. If you have allergies, asthma, or respiratory issues, a dirty fan is actively making your life worse.
Efficiency: A dust-covered fan has to work harder to push air through all that buildup. This means it’s using more electricity, running louder, and not cooling you as effectively. Clean blades spin more efficiently and move more air with less effort.
Longevity: Dust buildup can get into the motor housing and mechanisms, potentially shortening your fan’s lifespan. Regular cleaning helps your fan last longer.
It Just Looks Terrible: Let’s be honest – a grimy, dust-covered fan is gross. It makes your whole room look dirty even if everything else is spotless.
Now that you’re motivated, let’s get to the actual cleaning process.
What You’ll Need (Stuff You Probably Already Have)
The beauty of cleaning a fan is that you don’t need special equipment. Here’s your supply list:
Basic Supplies:
- Microfiber cloths or old rags (at least 2-3)
- A vacuum cleaner with brush attachment
- Mild dish soap
- Warm water
- A bucket or large bowl
- Screwdriver (flathead or Phillips, depending on your fan)
Optional But Helpful:
- Old pillowcase (genius hack coming up)
- Small cleaning brush or old toothbrush
- Compressed air can
- Rubbing alcohol (for sticky grime)
- Step ladder (for ceiling fans)
- Newspaper or drop cloth (to protect floor)
Safety First:
- Turn off and unplug your fan before starting
- If it’s a ceiling fan, turn off the circuit breaker to be extra safe
- Let the fan sit for a few minutes if it’s been running – the motor and housing can be warm
Seriously, unplug it. I know it seems obvious, but every year people clean fans with the power still on and create dangerous situations. Just unplug it.
How to Clean a Standard Box or Oscillating Fan
Let’s start with the most common type – your basic box fan or oscillating fan. These are the workhorses sitting in bedrooms, offices, and living rooms across the world.
Step 1: Disassemble the Fan
Take the fan somewhere easy to clean, like your garage, patio, or bathroom. Lay down newspaper or a drop cloth if you’re doing this indoors because dust is about to fly everywhere.
Most fans have clips or screws holding the front grill in place. Look around the edges of the grill for these fasteners. Some fans have simple clips you can release by hand. Others need a screwdriver.
Remove the front grill first. Then, carefully remove the blade assembly. On most fans, there’s a center cap or spinner that either screws off or pops off, and then the blades can be slid off the motor shaft. Take a photo before you disassemble if you’re worried about putting it back together wrong.
Remove the back grill if possible. Some fans have this as a separate piece, others don’t.
Step 2: Vacuum Away Loose Dust
Before getting anything wet, use your vacuum with the brush attachment to remove loose dust from all the parts you’ve removed. Vacuum the grills, blades, and the motor housing thoroughly.
This step prevents you from just smearing wet dust around later. Get as much dry dust off as possible first.
Step 3: Wash the Removable Parts
Fill your sink or a bucket with warm water and a few drops of dish soap. Submerge the grills and wipe them down with a cloth or sponge. For stubborn grime in the grill holes, use an old toothbrush.
For the blades, wipe them down with a soapy cloth rather than submerging them (especially if they’re attached to any electrical components). Get both sides clean.
Rinse everything thoroughly with clean water to remove soap residue. Soap left behind will attract dust faster.
Step 4: Clean the Motor Housing
This is the part you can’t submerge in water because it contains the electrical components.
Wipe down the exterior with a slightly damp cloth. For vents and crevices, use a dry brush or compressed air to blow out dust. If you see dust inside the motor housing through the vents, use compressed air to blow it out – but do this outside because it’ll create a dust cloud.
Step 5: Dry Everything Completely
This is crucial. Do not reassemble a fan with wet parts. Water and electricity don’t mix, and damp parts can rust or corrode.
Let everything air dry completely. You can speed this up by wiping parts with a dry towel, but still let them sit for 30 minutes to ensure complete dryness.
Step 6: Reassemble
Put everything back together in reverse order. Blades back on the motor shaft, front grill secured, all screws or clips replaced. Give the blade assembly a gentle spin by hand to make sure nothing’s rubbing or misaligned.
Plug it back in and test it on low speed first to make sure everything sounds normal.
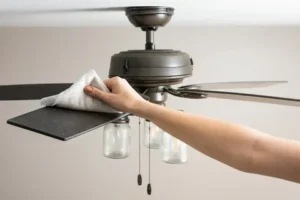
How to Clean a Ceiling Fan Without Taking It Down
Ceiling fans collect an insane amount of dust because warm air rises and deposits dust on those horizontal surfaces. But the good news is you don’t need to take them down to clean them.
The Pillowcase Method (Genius and Less Messy):
Grab an old pillowcase. Climb your ladder so you can comfortably reach the blades.
Slide the pillowcase over one blade so the blade is inside the pillowcase. Press your hands together through the fabric on both sides of the blade and pull the pillowcase toward you.
The dust stays trapped inside the pillowcase instead of falling all over your furniture and floor. It’s brilliant. Do this for each blade.
Traditional Method:
If you don’t have pillowcases to sacrifice, use a damp microfiber cloth. Climb up and wipe each blade on top and bottom, working from the center outward toward the edge. Have a trash bag or bucket nearby to dispose of the dirty cloths.
For the Motor Housing and Hardware:
Wipe down the motor housing, light fixtures (if attached), and all visible hardware with a slightly damp cloth. Use a dry brush for decorative details or vents where dust accumulates.
Don’t Forget the Pull Chains:
Wipe down the pull chains if your fan has them. They get surprisingly grimy from hands touching them constantly.
Cleaning Frequency:
Ceiling fans should be cleaned every 2-3 months if you use them regularly. Monthly if you have pets or live in a dusty area.
How to Clean a Tower Fan
Tower fans are slightly trickier because they’re not designed to be easily disassembled. But you can still get them clean.
Step 1: Vacuum the Exterior
Use your vacuum’s brush attachment to vacuum all the intake grills and vents. Tower fans pull air in from the back or sides and blow it out the front, so focus on those areas.
Step 2: Use Compressed Air
Spray compressed air through the grill openings to dislodge internal dust. Do this outside or in a garage because dust will blow out everywhere.
Step 3: Wipe Down the Exterior
Use a damp microfiber cloth to wipe down the entire exterior. For stubborn spots, use a cloth dampened with a mixture of equal parts water and white vinegar.
Step 4: Clean the Base and Controls
Don’t forget to clean the base, buttons, and control panel. These areas accumulate hand oils and dust.
For Deeper Cleaning:
Some tower fans have removable filter panels or front grills. Check your user manual. If parts can be removed, take them off and wash them in soapy water, dry completely, and replace.
Step 5: Let It Dry
Before plugging back in, make sure any damp areas are completely dry.
How to Clean an Exhaust Fan (Bathroom or Kitchen)
Exhaust fans are the forgotten heroes of your home, pulling moisture and odors out of bathrooms and kitchens. They also get absolutely filthy because they’re pulling grease particles (kitchen) or moisture and dust (bathroom) constantly.
Step 1: Turn Off Power
Go to your circuit breaker and turn off power to the exhaust fan. This isn’t optional – you’ll be working with electrical components.
Step 2: Remove the Cover
Most exhaust fan covers have clips or springs holding them in place. Push up on the cover while squeezing the clips together, and it should drop down. Some covers have screws – remove those.
Step 3: Remove the Fan Unit
The actual fan is usually attached with a plug connector. Unplug it and carefully remove the entire fan unit from the housing.
Step 4: Clean the Fan Blades and Housing
Soak the fan unit in hot soapy water if it’s really grimy (especially kitchen fans with grease buildup). For bathroom fans, wiping with a damp soapy cloth is usually sufficient.
Use an old toothbrush for stubborn grime on the blades.
Vacuum out the housing cavity in the ceiling. You’ll be amazed at how much dust is up there.
Step 5: Clean the Cover
Soak the cover in hot soapy water. For plastic covers, this works perfectly. For metal covers with heavy grease, you might need a degreaser.
Step 6: Dry and Reassemble
Make absolutely sure everything is completely dry before reconnecting the fan unit and replacing the cover. Turn the power back on and test.
Cleaning Schedule:
Clean bathroom exhaust fans every 6 months. Kitchen exhaust fans should be cleaned every 3 months due to grease buildup.
How to Clean a Window Fan
Window fans sit right where outside dust, pollen, and debris meet your home’s interior dust. They get filthy fast.
Step 1: Remove From Window
Take the fan out of the window completely. You can’t properly clean it while it’s installed.
Step 2: Disassemble
Most window fans have removable front and back grills secured with clips or screws. Remove these grills.
Step 3: Wash the Grills
Wash both grills in warm soapy water. A handheld shower or garden hose works great for rinsing. Let them dry completely.
Step 4: Clean the Blades
Wipe down the fan blades with a damp cloth. If they’re really dirty, use a cloth dampened with rubbing alcohol to cut through grime.
Step 5: Clean the Frame
Wipe down the entire frame and handle. Window fans often have accumulated grime from touching and from window grit.
Step 6: Reassemble and Reinstall
Once everything’s dry, reassemble the fan and reinstall it in your window.
Deep Cleaning vs. Maintenance Cleaning
Here’s something important to understand: there’s a difference between a deep clean (what I’ve described above) and regular maintenance cleaning.
Maintenance Cleaning (Do this monthly):
- Quick vacuum of grills and blades
- Wipe down with a damp cloth
- Takes 5-10 minutes
- Prevents massive buildup
Deep Cleaning (Do this 2-4 times per year):
- Full disassembly
- Washing all removable parts
- Thorough cleaning of motor housing
- Takes 30-45 minutes
- Gets rid of accumulated grime that maintenance cleaning misses
If you do monthly maintenance cleaning, your deep cleans will be much easier because you’re not dealing with months of caked-on dust.
Common Mistakes to Avoid
Let me save you from some painful lessons I’ve learned:
Don’t Skip the Unplugging Step: I know I’ve said this already, but it’s worth repeating. Always unplug first. Always.
Don’t Submerge Electrical Components: Grills and blades? Fine to wash. Motor housing or anything with wiring? Wipe only with a damp cloth, never submerge.
Don’t Reassemble While Wet: Seriously, wait until everything is bone dry. Impatience here can ruin your fan or create safety hazards.
Don’t Use Harsh Chemicals: Mild dish soap and water work fine for almost everything. Harsh cleaners can damage fan finishes and leave residues that attract more dust.
Don’t Forget to Clean the Base: Everyone focuses on blades and grills but forgets the base, which also collects dust and can transfer it back to the clean parts.
Don’t Rush the Drying: Give parts at least 30 minutes to air dry after washing. An hour is better. Overnight is safest if you’re not in a hurry.
Making Future Cleaning Easier
Want to make your life easier going forward?
Clean More Often: Counterintuitive, but monthly quick cleanings are easier than quarterly deep cleans. A little maintenance prevents massive buildup.
Run Your Fan Regularly: Fans that sit unused collect more dust than fans that run regularly. The air movement actually helps keep some dust from settling.
Use Air Filters: If you have central air or HVAC, keep those filters clean. Less dust in your air means less dust on your fans.
Consider Fan Placement: Fans placed in high-traffic areas or near windows collect more dust. Can’t always change placement, but it’s worth considering.
Dust Your Room Regularly: This seems obvious, but the less dust in your environment, the less dust on your fan. Regular dusting and vacuuming of your room helps.
Special Situations and Troubleshooting
Sticky or Greasy Buildup: This is common in kitchen fans. Use a degreaser or a paste made from baking soda and water. Let it sit for 10 minutes before wiping.
Mold or Mildew: If you spot mold (usually on bathroom fans), clean with a solution of one part white vinegar to one part water. Make sure the fan is completely dry before reassembling.
Fan Still Smells After Cleaning: The smell might be coming from dust in the motor housing. Try using compressed air to blow out internal dust. If the smell persists, the motor might need professional service.
Fan is Loud After Cleaning: Check that everything’s reassembled correctly. Make sure no screws or clips are loose. Ensure the blade assembly is properly balanced and secured on the motor shaft.
Fan Won’t Turn On After Cleaning: Double-check that it’s completely dry. Verify all electrical connections are properly plugged in. Make sure you didn’t accidentally trip a circuit breaker or blow a fuse during cleaning.
The Bottom Line on Fan Cleaning
Look, I know cleaning a fan isn’t the most exciting thing you’ll do today. But here’s the reality: spending 20-30 minutes cleaning your fan now means cleaner air, better cooling, lower electricity bills, and a fan that lasts longer.
Plus, once you’ve done it once following these steps, you’ll realize it’s not nearly as complicated or messy as you feared.
Set a reminder on your phone for monthly quick cleanings. Mark your calendar for quarterly deep cleans. Turn it into a routine, and it becomes just another simple household task rather than this overwhelming project you keep avoiding.
Your lungs will thank you. Your allergies will thank you. Your electricity bill might even thank you.
Now grab those supplies and go tackle that dusty fan. You’ve got this.
What’s your biggest challenge with cleaning fans? Got any tips or tricks to share? Drop them in the comments below – let’s help each other keep our fans (and our air) clean!